How To Make Plantation Shutters

Plantation Shutters are not Easy to Make
When it comes to making plantation shutters, you need to have a plan to follow. I make plantation shutters for a living and I will show you how involved the process is to make them. I will not provide you with a plan to make your own. Rather my goal here is to demonstrate to you why you would be better off to just buy them rather than go through the headache of trying to make a perfect shutter custom fit for each window in your house. There are other sites that claim they can show you how to make your own plantation shutters, or claim it can be done with $20 worth of wood, or even show you their finished product which does not even close all the way. The fact is, there are numerous manufacturers of plantation shutters and each one has spent money on research and design to come up with their own plans to manufacture them. If it was a task that the average Joe could do in his garage on the weekend, they wouldn't cost so much. However, there are probably some of you that could make your own plantation shutters from scratch. But you probably have a woodshop available to you with all the proper tools to get the job done.
Here are the steps required to properly make a plantation shutter:
- Measure the window
- Prepare a cut sheet
- Cut the material
- Drill the material
- Paint the material
- Attach the hinges to the frame and stiles
- Drill and staple the louvers
- Assemble the door panels
- Assemble the frame
- Assemble finished shutter
Sounds easy right? The fact is, from start to finish it would take me about two hours to complete a standard two panel shutter. Mind you, this is with all the proper tools and years of practice. Trying to duplicate what I do in your garage with a Sawzall would take you ten times as long, trust me. Now the first step, measuring the window, is not really a step in making the plantation shutter, but it is important nonetheless. If you make a mistake measuring the window, your shutter will not fit in the window so make sure you do it correctly. You can follow the same steps used when measuring your window for blinds. The second step is also something you will not have the benefit of as a do-it-yourself-er. We use a computer program that when we enter the window measurements, it produces a cut sheet that tells us down to the thousandth of an inch, exactly what material we need to cut in order to make the plantation shutter.
Cutting the material
The first real step in making plantation shutters is to cut the material required. This is a crucial step in the process, a mistake here can result in wasting a lot of material. In order to ensure that we make precise cuts, we use a Tiger Stop in conjunction with a miter saw when cutting our material. The Tiger Stop is a device that takes the place of a tape measure. It is a computerized measuring device, we input a measurement on the keypad, and it moves a stop to the appropriate length relative to the miter saw. It really is a pretty cool piece of equipment and absolutely necessary to ensure that we cut our material to the exact length required. As you can already see, most people probably do not have one of these in their garage.


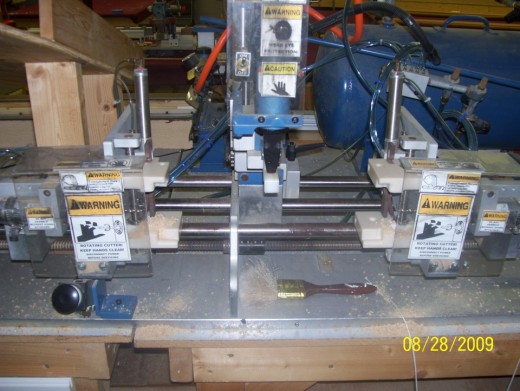
Drill the material
When we assemble the door panels together, we do it using nothing but wooden dowels and glue. This ensures that there are no visible screws or caps necessary to cover a screw hole. This is another step in the process that requires precision. If your holes do not line up correctly, you will end up with an uneven door panel which will not fit in the frame properly. To achieve this, we use another pretty cool piece of equipment, I am not even sure what it is called. It is basically a side mounted drill press, with multiple drill bits. I am not a woodworker, I just use the tools provided to me, so if anybody wants to enlighten me as to the proper name of this piece of equipment, just leave a comment. Anyway, the stiles and rails are laid down on the table portion of the drill and each one gets two holes drilled into the side of it.
Painting the material
The shutter we manufacture are a vinyl/wood composite material, so when we cut the pieces, there are exposed parts that need to be painted. Cheap plantation shutters on the other hand do not require paint as the plastic is the same color all the way through. We take pride in our product and paint the top and bottom of the stile, the bottom of the frame, the ends of the tilt bar, and both sides of each louver. Painting the louvers, or slats, is the longest part of the whole process. In addition to having to put two coats of paint on the sides of each louver, they first need to be sanded down. When we cut the material, especially if the saw blade is getting dull, cutting through the vinyl coating leaves little burs on the product that needs to be removed.
Attaching the hinges
If you have ever wondered how a door gets attached to a frame with a hinge and it comes out perfectly, I have a secret for you! We attach the hinges to the stile and frame before they are assembled. We lay the side frame down on a table with the inside facing up. Then we take the stile for the door and lay it next to the frame with the outside edge facing up. Then we take a jig and lay it down on top of both pieces and pre drill some pilot holes. Then all we do is lay the hinge down on top of the two pieces and screw it down. The hinge pin that holds the two pieces of the hinge together is then removed which allows us to separate the frame from the door stile.
- How to Measure Windows for Blinds
Whether you are installing your own blinds, or having them custom made for you, it is always a good idea to measure your windows first. Obviously if you are installing them yourself, you will need to know... - Window Treatments for Sliding Glass Doors
Sliding glass doors, or sliders for short, can create a problem when it comes time to choose a window treatment. There are many factors to consider before deciding on a window treatment such as: What other...
Drill and staple the louvers
Once the two coats of paint have dried on the louvers, it is time to drill holes into the side and attach a staple to the top of the louver. Before this can be done, any excess paint needs to be scraped off the surface of the louvers first. Once all the extra paint has been cleaned off, we use this other cool piece of machinery, again I have no idea what it is called. It has a crank that we use to adjust it to the exact size of the louver. Then we insert the louver, push a button, and the machine drills a hole in both sides of the louver. At the same time, it is clamped down and a mounted stapler inserts a staple into the top of the louver. After all the louvers have been drilled and stapled, we insert a plastic pin into each side. We then have to cut hole strips (a piece of plastic with holes in it that gets inserted to the inside of the door panel) that fit into the door. We then take the louvers, and staple them again to the tilt bar. The tilt bar with the attached louvers then gets inserted into the hole strip via the plastic pins in each side of the louver. You have all this stuff in your garage next to your Tiger Stop right?
Assemble the door panels
Each door is made up of two main parts, rails and stiles. The stiles are the sides of the doors, the vertical pieces if you will. There are regular stiles (the outside edge of the door) and rabbited stiles (the inside edge of the door). The rabbited stile has a lip built into it which allows one side to overlap the other side in order to black the incoming light. The rails are the pieces used to connect the stiles together. There is a top rail, a bottom rail, and sometimes a divider rail, or mid rail. The divider rail splits the door into two sections allowing either the top or bottom to be open to allow light while the other section remains closed. These are the pieces that we drilled earlier after all the material was cut. They are assembled by gluing wooden dowels into the rails first. The rails with dowels are then glued into the regular stile. The rabbited stile is then glued onto the rails. Once this is dry, you have one completed door panel. Repeat this process for a two door shutter.
Assemble the frame
Depending on the style of frame, we have a couple different ways to assemble them. A standard Z style frame is assembled by gluing dowels into the frame parts and then gluing the frame parts together. For a Deluxe Z or L style frame, we use a Hoffman, router to notch dove tail holes into the frame pieces. They are then connected together using plastic dove tails.
Assemble the shutter
Once the frame and doors are assembled, all that is left to do is put them all together. We start by laying the right side door into the right hand side of the frame and inserting the hinge screws back into the hinge. This attaches the right hand door to the right side of the frame. We then flip the whole frame over and lay it on a table face down. We then attach magnet to the frame and a strike plate to the back of the door at the top and bottom. The magnets are used to keep the doors closed and prevent them from flapping all over the place when they are closed. Then we flip the shutter over face up and attach the left hand door to the frame with the hinge pins.


